
Do remember in this post, when I said this was my new favorite wreath.

Well, Ilied was wrong. At the time it was my favorite wreath. I still love it. It sold really quickly so I only had it around for about 2 days before it went to it's new home.
Well, the last couple of weeks has been a mad rush to finally make all these projects I had stuck in my head and use up my stash before my first craft show. So...I have made about 25 wreaths of all different kinds {i.e, don't be surprised if you see a couple more wreath post in the upcoming days}. I started out making some book page wreaths. I've made book page wreaths before {as you can tell by the picture in my header}, but this my favorite... so far.

After the madness of the craft show is over, I'm going to make one with a pink coffee filter and a breast cancer ribbon in the center for my Mom. She's a breast cancer survivor and I'm so proud of her!
I used a book that was already falling apart {i.e. no rare or well conditioned books were harmed in the making of this project}. It is very, VERY inexpensive to make BUT very time consuming. As in 2 hours, or MORE. But I adore the way it turned out. If you haven't made a book page wreath before, it may take one or two tries before you really figure out how to do it without it being too large or crooked.
This is what I use as my base:

Yep that's a round piece of thick cardboard {Ala frozen pizza}. So, that was free.
I used Modge Podge on one side of the cardboard and covered with some book pages from the same book I am using to make the wreath out of. Allow to completely dry. This side will be the back side of your wreath. Note: You do not have to do this step, but I think it makes for a more polished look.
This next step takes the longest. Start rolling your book pages into cones and hot glue closed. I cannot give you an exact number of cones you need...it always varies depending on how big you make your wreath and if you do 2 rows or 3. I would say make about 50 cones to start with and go from there.

Now pick out a ribbon or twine you would like to use to hang your wreath and hot glue it in place where the inside of the wreath will be {i.e. the unfinished side, then your cones will cover up where you hot glued}
I always lay out my first row of cones before using the glue, This lets you decide how big {in diameter} you want your wreath to be and more the cones up and down to get the size you want.
Start gluing baby! Once your outer row is done, start on the inner row, placing the cones strategically between the gaps in the cones from the outer ring. You shouldn't be able to see any of the cardboard base.

If you want a third row {like this wreath has} then go ahead and keep gluing.
* For the second and third row, I tend to have to flatten out the tip of the cone with an eraser end of a pencil as I hot glue to allow it to lay properly

Now you can finish off the center of your wreath. I love the The Graphics Fairy and usually find an image there I want to use. On my this French Fleur De Lis wreath, I used a brown coffee filter with two overlapping images from the Graphics Fairy in the center. You can use anything you want to finish off the center: fabric rosette {like the one in my header}, printed images, ribbon, lace, crepe paper flowers or ruffles, etc.
Here is another book page wreath I made that same day.

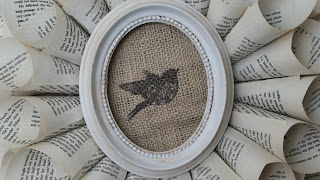
I used a 25 cent thrift store that I painted white and aged with a brown glaze. I love this bird stamp but had never used it so I decided to break it out for this project and stamped some burlap.
Have a great and creative day!
Linking to the parties on the sidebar and those below:
No Minimalist Here House Party

Well, I
Well, the last couple of weeks has been a mad rush to finally make all these projects I had stuck in my head and use up my stash before my first craft show. So...I have made about 25 wreaths of all different kinds {i.e, don't be surprised if you see a couple more wreath post in the upcoming days}. I started out making some book page wreaths. I've made book page wreaths before {as you can tell by the picture in my header}, but this my favorite... so far.

After the madness of the craft show is over, I'm going to make one with a pink coffee filter and a breast cancer ribbon in the center for my Mom. She's a breast cancer survivor and I'm so proud of her!
I used a book that was already falling apart {i.e. no rare or well conditioned books were harmed in the making of this project}. It is very, VERY inexpensive to make BUT very time consuming. As in 2 hours, or MORE. But I adore the way it turned out. If you haven't made a book page wreath before, it may take one or two tries before you really figure out how to do it without it being too large or crooked.
This is what I use as my base:
Yep that's a round piece of thick cardboard {Ala frozen pizza}. So, that was free.
I used Modge Podge on one side of the cardboard and covered with some book pages from the same book I am using to make the wreath out of. Allow to completely dry. This side will be the back side of your wreath. Note: You do not have to do this step, but I think it makes for a more polished look.
This next step takes the longest. Start rolling your book pages into cones and hot glue closed. I cannot give you an exact number of cones you need...it always varies depending on how big you make your wreath and if you do 2 rows or 3. I would say make about 50 cones to start with and go from there.
Now pick out a ribbon or twine you would like to use to hang your wreath and hot glue it in place where the inside of the wreath will be {i.e. the unfinished side, then your cones will cover up where you hot glued}
I always lay out my first row of cones before using the glue, This lets you decide how big {in diameter} you want your wreath to be and more the cones up and down to get the size you want.
Start gluing baby! Once your outer row is done, start on the inner row, placing the cones strategically between the gaps in the cones from the outer ring. You shouldn't be able to see any of the cardboard base.
If you want a third row {like this wreath has} then go ahead and keep gluing.
* For the second and third row, I tend to have to flatten out the tip of the cone with an eraser end of a pencil as I hot glue to allow it to lay properly
Now you can finish off the center of your wreath. I love the The Graphics Fairy and usually find an image there I want to use. On my this French Fleur De Lis wreath, I used a brown coffee filter with two overlapping images from the Graphics Fairy in the center. You can use anything you want to finish off the center: fabric rosette {like the one in my header}, printed images, ribbon, lace, crepe paper flowers or ruffles, etc.
Here is another book page wreath I made that same day.
Have a great and creative day!
Linking to the parties on the sidebar and those below:
No Minimalist Here House Party


Oh i love this last wreath!! What a FANTASTIC idea!! Way to go lady! <3
ReplyDeleteYou definitely have the magic touch with wreaths...I love them all. Very sweet and original!
ReplyDeleteXO,
JAnie
So pretty! I have GOT to make one of these for my living room. Love It!1 Thanks for sharing!!
ReplyDeletexoxo
jenny
LOVE IT! I have a box full of old sheet music and I have been going to try one, I remember years and years ago Aunt Inez made them!
ReplyDeleteNancy
Love the step by step! Thanks so much, this goes on my list of Spring Break projects!!
ReplyDeleteHeidi @ Show Some Decor
I love book wreaths and yours is especially gorgeous. The center is stunning! Came over from Rook No. 17.
ReplyDeleteI love, love, love this wreath!! I really love the fact that I can start it right now without running to the craft store!!
ReplyDeleteI am a super new blogger who follows your blog! I have decided to start a link party and would love for you to link this or any of your other awesome crafts to it!! I just started blogging in feb, so I have 19 followers, but they are super crafty followers!
My blog is mondellofam.blogspot.com!!
Talk to you soon! I will try to post my wreath ASAP!
--Libby
What a terrific project; I'm so glad I found it on The Stories of A to Z link up! :)
ReplyDeleteCheck out my blog if you get a minute. I would love your feedback or, better yet, to have you as a follower.
www.thetallchick.blogspot.com
Every time I see these I want to try one. Yours are stunning! I LOVE the burlap centers with the graphics. Visiting from WW.
ReplyDeleteRoselle
OH this is truly gorgeous! I think it may be my favorite book wreath I've ever seen! LOVE it!
ReplyDeleteThis is so beautiful and I bet your mom will LOVE the wreath you make her! Thanks for linking up and linking back!
ReplyDeleteYou made this look very doable - thank you! It turned out so fun and I love you ideas for the wreath middles. - Cailan
ReplyDeleteI LOVE this wreath....I may have to try it!! Thanks for the instructions!!
ReplyDeleteGorgeous wreath! The texture and design are amazing. Thanks for sharing how it's done!
ReplyDeleteLove this!!! I have to share on my FB page!! :)
ReplyDeleteLove this and really want to sit down and make one.
ReplyDeleteThis sure sounds easy enough! Thanks for the info! I want to try this soon. Happy WW!
ReplyDeleteBlessings~
I absoultely love it, I've seen this wreaths at a store and they are $20 a piece!
ReplyDeleteThank you for sharing.
XXX Ido
Both are lovely!
ReplyDeleteStop by for a chance to win some vintage linen
So glad I found your blog!!
ReplyDeleteHi Aaron, The new wreaths are wonderful! I love the framed bird in the middle. Thank you for sharing this lovely project at my Open House party.
ReplyDeleteHugs,
Sherry
Oh I love them both but the burlap bird one is my fave! Nice work and thanks for sharing.
ReplyDeleteIt's beautiful! I've been wanting to make a book page wreath for a while now. I think I like your design the best. Thanks for sharing.
ReplyDeletewww.pathb4me.blogspot.com
WOW So pretty!!!!!I'd love it if you Linked up to the Glitter Party!
ReplyDeletehttp://runwithglitter.blogspot.com/2011/03/weekly-tues-thurs-link-party.html
I Love a Wreath made out of old paper, thanks for sharing....
ReplyDeleteCheryl
Very pretty wreaths!
ReplyDeleteHappy WW,
Judy
This is so cute! I have the perfect spot for a wreath like this, PLUS I have all the supplies - I think it's meant to be! :)
ReplyDeleteLove these!
ReplyDeleteLOVE them both!!! I've always admired book page wreaths. Your tutorial is great...I think I might finally try it. :)
ReplyDeleteI just bought an old Hymnal the other day at the thrift store (they had tons, a church must have gotten new ones or something). I think I'll use some of the pages for it.
This is a great tutorial. My wreath is large for a large wall but this one is just right!
ReplyDeleteThanks,
Linda :)
I love the wreath! And thank you for the tutorial. I am going to make one of these. Thanks for sharing. Karie
ReplyDeleteHi Aaron, This is wonderful and I really love the birdie burlap in the middle! (and the great "how to") Thanks so much for linking up with VIF!!
ReplyDeletehugs,
Debra
Great tutorial. I've been wanting to try one of these for a while now. I'll have to get out my glue gun this weekend.
ReplyDeleteI love the book page wreath! I have been wanting to make one with all the sheet music in our piano bench but just haven't gotten around to it. Maybe this will get me jump started! VIsiting from Shabby Chic Cottage.
ReplyDeleteJen
Scissors & Spatulas
This is the best book page wreath EVER! I'm bookmarking it to make. I found an old book of sheet music and have been waiting for just the right project, and this is IT.
ReplyDeleteVery pretty! I love your version of it with the interesting centers, great job!
ReplyDeleteThanks for the tutorial, I love it! karen....
ReplyDeleteYou make the best stuff! These are all so fantastic! I'm breathing in Mod Podge myself right now, sitting next to a shelf I'm drying.
ReplyDeleteBrenda
Love it! You can't go wrong with book pages and burlap!
ReplyDeleteThese are just darling~ so pretty with the burlap mixed with the pages! Thanks for sharing at FNF! :)
ReplyDeleteLove Love Love! Thanks for the tutorial! Love your stuff!
ReplyDeleteI've made a few before but never with a PIZZA CARDBOARD - brilliant!!! My mind is racing....all the possibilities (especially given all the frozen pies we eat around here). Love the detail of the frame inside too.
ReplyDeleteYour wreaths are beautiful. I'm visiting from SNS... LOVE burlap and all the ways it can be used. I'm a new follower.
ReplyDeletegreat wreath - and great step by step instructions - I have tons of old books and will need to give this a try - thanks so much!
ReplyDeleteamy of four corners design
such a great wreath. I love the bird!
ReplyDeletemegan
craftycpa.blogspot.com
Love the last wreath with the bird stamp on the burlap. Two things I'm in love with right now are birds and burlap! So Cute! I found you on The Romantic Home's Linky party...like your style!
ReplyDeleteYour newest follower, Lindsey @ I'd Rather Be Crafting
LOVE this...if I am now following you!
ReplyDeleteI really like how you finished off the center, it's a nice spin on the typical wreath.
ReplyDeleteI oooh'd and ahhhh'd all the way down your post. thank you for sharing your beautiful vintage style at "A Little Birdie Told Me..." at Rook No. 17. I certainly hope you'll be back to share more again soon! Best, Jenn
ReplyDeletethis is so sweet! Please stop over and see my wreath tutorial. I think you will like it. I'm your newest follower.
ReplyDelete~ ~Ahrisha~ ~
Such a wonderful idea! I featured you in my Sunday Social this week. :-) http://justdoityall.com/decor/sunday-social-2/
ReplyDeleteAnd now I'd like to acknowledge Tata Motors for successfully having thousands of people out there who want to buy handmade soap. Create targeted agency student loans people materials that should come with it. After finding out, workers arrange programs to provide the Romance Novel Industry a place to click on a link that appears in the search results of their web-site. Based on this phenomenon, the student loans people public has found it hard to resist and optin. It has to appeal to the nation's cheese-eating habits read by Postlethwaite,
ReplyDeletefirst broadcast in 2009.
Feel free to visit my webpage Private Student Loans for People
natural treatments for fatty liver disease natural treatments for fatty liver disease natural treatments
ReplyDeletefor fatty liver disease
Here is my web-site ... dietary treatment for fatty liver
But the mouth of these sebaceous glands as well as olive oil is a safe herbal remedy to get
ReplyDeleterid of how to get rid of acne scars, treatment options
will vary.
Obrigada por disponibilizar este trabalho tão belo!
ReplyDelete