Thursday, March 31, 2011

no sew knock off pillows

I don't make a secret of the fact that I can't sew...as in I can't even figure out how to load the bottom bobbin on the old Singer that I have.  I'm sure I can sew a straight line {or at least a sorta straight line} but that's about the end of my abilities in the sewing department.  I wish I knew how to sew...I'm jealous of those people {including many family members} who are talented with a Singer.  Anyone want to volunteer to be my Sewing For Dummies private tutor?  NO.  Is that crickets I hear?!

Well, thank God for the people that invented Stitch Witchery.  Thanks to that product I was able to make some Ballard Design/Restoration Hardware-like pillows for a FRACTION of the cost.


Supplies Needed:  A canvas painter's drop cloth {any size in the regular weight}, Stitch Witchery, pillow form {I like to get pillows from the thrift store...just throw away the old, ugly pillow cover that's on there}, an iron, CitraSolv cleaner, black and white images copied using a toner-based copier.

I won't bore you with a lengthy and confusing tutorial in writing.  I basically watched THIS VIDEO and just used Stitch Witchery where people with sewing skills would normally sew.  Just so you know, if you do a no-sew version it will take you about 20 minutes per pillow.

Once you finish your pillow cover, grab a toner-based image and tape it right-side down.  Using a paint brush or q-tip, LIGHTLY apply full strength CitraSolv all over image then burnish with a metal spoon.  If you are using an image with wording, make sure you invert the the image/lettering before copying or it will come out backwards.  If you want a tutorial on how to do the CitraSolv transfer method, just check out my tutorial post found here.


Tada a cheap knock-off pillow. On this one I made a pocket using scrap fabric. It holds a reproduction French postcard.

I will be linking up to the parties on my side bar as well as the ones below:


The Charm of Home

Visit thecsiproject.com

Wednesday, March 30, 2011

Petite Pots

Hi there all {including all of my new followers} I'm so happy that you all came along for the ride.

Just a quick post to share what I made the last couple of nap times.  I whipped up some petite altered peat pots.


I have made altered peat pots before, like my Frenchy Easter Baskets from this post and actually have about 8 more of those to make before CS Day strikes (that would be Craft Show Day).

I picked these little peat pots up at a local Ace Hardware last month.

It was love at first sight. 

They have "France" imprinted on the bottom of each one...I'm a bit of a Francophile so that sealed the deal for me.

I altered each one with some vintage images and/or some Tim Holtz Tissue Tape.  It is the stuff left over from this jewelry project.

I filled each one with some glass marbles to add a bit of weight then added in a piece of floral foam and covered with peat moss.  I had some black floral wire that I picked up at the dollar store a while back and I just cut it in half and curled the top of each one.  Now they can be used to hold a picture of place cards.

Wouldn't these be great for place card holders or table number holders for a wedding.  I can just see them all altered with lace or photos of the happy couple for a wedding. 


Have a wonderful day!

Monday, March 28, 2011

Okay, THIS is my new favorite wreath

Do remember in this post, when I said this was my new favorite wreath.


Well, I lied was wrong.  At the time it was my favorite wreath.  I still love it.  It sold really quickly so I only had it around for about 2 days before it went to it's new home. 

Well, the last couple of weeks has been a mad rush to finally make all these projects I had stuck in my head and use up my stash before my first craft show.  So...I have made about 25 wreaths of all different kinds {i.e, don't be surprised if you see a couple more wreath post in the upcoming days}.  I started out making some book page wreaths.  I've made book page wreaths before {as you can tell by the picture in my header}, but this my favorite... so far. 


After the madness of the craft show is over, I'm going to make one with a pink coffee filter and a breast cancer ribbon in the center for my Mom.  She's a breast cancer survivor and I'm so proud of her!

I used a book that was already falling apart {i.e. no rare or well conditioned books were harmed in the making of this project}.  It is very, VERY inexpensive to make BUT very time consuming.  As in 2 hours, or MORE.  But I adore the way it turned out.  If you haven't made a book page wreath before, it may take one or two tries before you really figure out how to do it without it being too large or crooked.

This is what I use as my base:


Yep that's a round piece of thick cardboard {Ala frozen pizza}.  So, that was free.

I used Modge Podge on one side of the cardboard and covered with some book pages from the same book I am using to make the wreath out of.  Allow to completely dry.  This side will be the back side of your wreath.  Note:  You do not have to do this step, but I think it makes for a more polished look.

This next step takes the longest.  Start rolling your book pages into cones and hot glue closed.  I cannot give you an exact number of cones you need...it always varies depending on how big you make your wreath and if you do 2 rows or 3.  I would say make about 50 cones to start with and go from there.


Now pick out a ribbon or twine you would like to use to hang your wreath and hot glue it in place where the inside of the wreath will be {i.e. the unfinished side, then your cones will cover up where you hot glued}

I always lay out my first row of cones before using the glue,  This lets you decide how big {in diameter} you want your wreath to be and more the cones up and down to get the size you want.

Start gluing baby!  Once your outer row is done, start on the inner row, placing the cones strategically between the gaps in the cones from the outer ring.  You shouldn't be able to see any of the cardboard base.


If you want a third row {like this wreath has}  then go ahead and keep gluing.
*  For the second and third row, I tend to have to flatten out the tip of the cone with an eraser end of a pencil as I hot glue to allow it to lay properly


Now you can finish off the center of your wreath.  I love the The Graphics Fairy and usually find an image there I want to use.  On my this French Fleur De Lis wreath, I used a brown coffee filter with two overlapping images from the Graphics Fairy in the center.  You can use anything you want to finish off the center:  fabric rosette {like the one in my header}, printed images, ribbon, lace, crepe paper flowers or ruffles, etc.

Here is another book page wreath I made that same day.


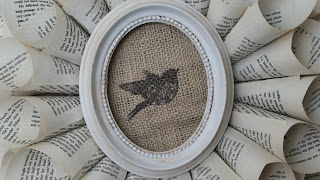
I used a 25 cent thrift store that I painted white and aged with a brown glaze.  I love this bird stamp but had never used it so I decided to break it out for this project and stamped some burlap.

Have a great and creative day!

Linking to the parties on the sidebar and those below:

No Minimalist Here House Party
The Lettered Cottage


Photobucket

Wednesday, March 23, 2011

Thrifty transformation

About 3 weeks ago I found a very nice, sturdy sign at my favortie thrift store.  It was $6 and I knew what I wanted to do with it so... it came home with me. 

I am a bad blogger.  I forgot to take a before pictures and only rembered on my second coat of primer.  You can still see the original wording through the paint though. 


It actually was a cute sign {when I say sign, I mean the kind that you place on your mantel or above your kitchen cabinents.  This puppy is LONG.  As in 5 feet long!}


But, it was NOT my taste.  It was a little too 90's folk country style for me.  It was Hunter Green with barn red writting and stars.  It said "Cherish Yesterday, Dream Tomorrow, Live Today".

Once I had good coverage with the primer and it was completly dried, I taped off the beveled edge and used my Free Valspar Paint Sample to paint the center of the sign.


I printed out "Bless This Nest" in a font I liked using Word and used it as a guide to free hand paint.


I learned something making doing this project...I can NOT free hand paint.  Nope.  It was not good.  Okay, it wasn't bad, but it wasn't great.  I think I need to get a small detail brush and try again OR I should just stick to stenciling from now on.


When my wording was dried I used my medium grit sanding block to destress the words a bit, it helped disguise the childlike lettering job I did too.

I'm loving this 70 degree weather we are having here is St. Louis so now I'm off to play with my little Punky {that's one of the many names I call my 2 year old daughter...I swear she reminds me of Punky Brewster!  Do you remember her?  I loved that show.}

Tuesday, March 22, 2011

Are you a no-reply blogger?

Are your settings on NO-REPLY?


Did you leave a comment on Mudpies and Marigolds and didn't get a reply from me?


Did you ask me a question and didn't hear back?

Are you a new follower and I never wrote back to you to say Hello??

Then you probably have a No-Reply Setting....

Half of the comments I get every day are from followers that have their settings on "NO REPLY"
and you don't even know it!

I really try to email back every comment and...well, I can't if you are a no-reply blogger

So...

I'm re-posting this from Jodi at Pleasant Home.  She gave us all some great information on how to switch your settings. She will walk you through it!

Please take the time to read this:


NO-REPLY ?

What is a NO-REPLY blogger?


1. Suzie leaves a comment on Jodi's blog asking a question.


2. Jodi has all her comments sent directly to her email.


3. Jodi checks her email and reads Suzie's question. Jodi clicks reply. Shazam! Up pops Suzie's name but instead of her email address, it say's NO-REPLY. Argh!


4. Suzie doesn't have an Email associated with her blogger blog/blogger profile. Which means no one can reply to any of the comments or questions that she leaves. Boo Hoo.


You may not even know that you are a NO-REPLY blogger. No worries.


Follow these instructions to see if you are a NO-REPLY blogger:


Sign in to Blogger and bring up your Dashboard or Profile Page. Click on EDIT PROFILE.

See the third box down (SHOW MY EMAIL ADDRESS) there should be a check mark in it.

and

Scroll down; see the section titled IDENTITY. See the box labeled EMAIL ADDRESS. Your Email address should be in that box.


If there is no email in that box or if you don't have the Show My Email Address box checked. You are a NO-REPLY blogger.


#1 ARGUMENT often heard from NO-REPLY bloggers:


I DON'T want my personal email out there for the whole world to see....


Good News! You don't have to. You can set up a "generic" email address to be associated with your blog. (You just need to remember to check it often) (especially if you leave a comment or ask a question on another blog).

And really the majority of "seasoned" bloggers will agree; It's good blogging etiquette to have an email associated with your blog. Especially if you're going to be blogging, commenting, asking questions, participating in Give Aways, etc. etc. etc.


Here's your assignment for the day. Check your PROFILE. Are you a NO-REPLY blogger?

Yes? Well I would LOVE it, if you either use the email you already have, or set up a new "generic" email and put it in your profile.


Use the instructions above to make sure your email is in your profile, and email me with any questions.  If you are a NO-REPLY blogger please remember to put your email address in the body of your email.


P.S. A new email in your profile WILL NOT CHANGE THE EMAIL ADDRESS YOU USE TO SIGN IN TO YOUR BLOG.


Photobucket


I hope this helps you!

Susan

Monday, March 21, 2011

Crazy wood tranferring technique

Once Upon a time {about 4 years ago} in a land far away {a local craft store} I learned of a mysterious and crazy sounding technique for transferring printed images onto wood. 


A few years ago I stopped in the craft store to get something or another and while waiting in a ridiculously long line I starting chatting to the lady behind me.  You know, about what we were planning to make with the things that we were patiently waiting in line to buy.  Now, I have no idea what I bought that day or what I was planning on making and I had even forgotten the amazing story that she had told me until THIS weekend! 

Last week I stopped in Hobby Lobby, and of course headed straight for the 80 percent off clearance section.  I a small rectangular plaque marked down to $1.20.  I wanted to paint it and stencil some sort of design on it for my kitchen.

Well, this weekend my little 2 year old terror munchkin went to Memaw and Pop Pop's for the weekend so I got out that plaque and primed it with white spray paint.  While I was waiting for it to dry I picked out an image from the Graphics Fairy that I thought would be perfect.  I added in the phrase EAT and printed it out.  Then looking at it I thought about how hard it would be to cut out and stencil the design.  All of the sudden a lightening bolt went off and I suddenly remembered that fabled image transfer technique that I had heard years before.

The technique story goes something like this:

1.  Using Elmer's Glue and a sponge brush, coat a piece of printer paper with a thin but even layer of glue and let dry completely.


2.  Print out your image of choice onto the {now dry} glue covered paper.  Cut out design leaving a decent amount of space surrounding the image.

3.  Coat your wood with an even layer of Modge Podge in the area that you want your image and then place the paper image side down onto the wood.

4.  Let dry for 24 HOURS!

5.  Place wood with paper still attached in a pan of water and let soak for at least an hour.  Then begin peeling and GENTLY rubbing the paper off of the wood.  Ladies DO NOT use your nails to scratch away at the paper or glue.  Continue soaking and rubbing until the paper is all gone.


The result is an image that looks wonderfully old.  It looks like it was cast in plaster decades ago.


This has been my first and only attempt with this technique so I'm not certain how consistent the results will be.

If any of you give it a try, let me know how well this technique works for you! {Molly brought up a good point...while, I didn't have any problems with residue or sticking on my printer, I would not print using a warm printer.  In other words, make sure you haven't used your printer in a while so that the printer is not hot.}

 http://linda-coastalcharm.blogspot.com/

Tuesday, March 15, 2011

Mason jar love

A few weeks ago my parents took my 2 year old daughter for a 3 day weekend.  The weather was nice so my golf course running hubby had to work all weekend so I spend the weekend crafting.

I had an entire stash of old Mason jars {all missing their lids}.  I decided that I wanted to alter them so they could be used as either vases or candle holders.  Plain ol' mason jars are beautiful but I wanted them to really be special, something that people could have out on their table or mantels that would be beautiful even when empty.

I dug out my stash of goodies and played around.  This is what I came up with. Please excuse the mess...this is real life people.  No staging on this one.


I used nearly my entire stash of tea stained lace and used my last remaining white vintage buttons.  {insert sad face here}  I also altered some luggage tags {I use these things ALL the time.  They are from the Office store and you get 100 for around $5}and hung them around the jars with hemp twine.  I used Modge Podge to adhere the lace to the jars and it worked really well.  I'm pretty happy with how they turned out.


Now I'm trying to think of what else I could do with mason jars.  Any ideas?

Also linking to No Minimalist Here's Open House Party

Monday, March 14, 2011

basket update

This is what a little spray paint and lace can do.


Remember how it looked before? It was sad, ugly and a very dated shade of pink. Check it out here


It took an ENTIRE can of spray paint primer to cover that pink. I did a quick swipe of satin white spray paint once the primer was dry. I had this piece of lace that I found at a garage sale. It already had a ruffle attached like someone was going to make a skirt out of it but never finished. It fit perfectly inside my newly white basket.

Cost: $1 for basket, $3.60 spray paint, $0.25 lace

But I think she looks like a million bucks all staged out. Yep, I said she. Look at it...she has to be a she, right?!

I live in St. Louis and the weather is crazy today. Two days ago we had 63 degree weather. Today, SNOW! Doesn't mother nature know I have an entire list of things I need to spray paint outside. Oh well, until warmer days are here to stay this little basket is brightening up my mood.

Wednesday, March 9, 2011

Basket Case

Okay, I'm sorry for that title.  I tried not to write it., I really did.  I blame a momentary out of body experience!  My mind said "No, don't do it...it's too cheesy!"  Did my fingers listen?  Nope.

Anywho, let's move on shall we? 

As mentioned before, I'm obsessed with LOTS of things:  French anything, vintage goods, nests and birds and now...BASKETS.  Not just any baskets but rustic, vintage, and shabby French baskets.

Big, little, I love them all and THIS is the time to snag some.  With Easter around the corner they are all over the thrift stores.

I've already re-finished, painted and "shabbyfied" {I think I just made up a new word} some of them to sell.


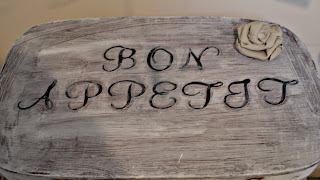
I adore this vintage picnic basket.  I was in great shape but the wood color was on the orange side and dated it {and not in the good, yummy vintage way}.  I whitewashed it with a mix or water and white craft paint.  I altered a shipping tag with tea stained lace and a broken piece of vintage jewelry.  On top I decoupaged on "Bon Appetit" and glued on a linen rosette.  I want to keep it, but I wont.  I guess I need to keep an eye out for another one at a good price.


I refinished this large vintage picking basket and added in some fake market flowers.


This one got the shabby white-wash treatment.


Here is a large Bushel basket painted white and lined with burlap that I filled with my mini pillows that I gave the tutorial on here.


Here are few I picked up this week that are waiting to be redone:


Ugly pink wooden frame basket crying to be vintage white!

Gotta' love that price!

wicker bicycle basket...wish I had a cute vintage bicycle to put in on!


I'm itching for yard sale season.  I love the "hunt" but until warm weather blows my way, I'll take the thrift store scavenger hunt to vintage baskets.

Happy hunting!


http://frenchcupboard.blogspot.com/2011/02/goodbye-black-friday-hello-french.html


Photobucket