
Having said that, I did make some jewelry. It kind of happened by accident. Well, as much as you can make something on accident. It happened when I was cleaning my craft room/guest room (which you can see here). It was a disaster. On a side note, I am sad to say it is a disaster again. Ugh. Anyway, as I was cleaning I came across this cool old little box of vintage scientific slides that I bought for $1 at a yard sale this past summer.
 |
| the now empty box |
I had no idea what I was going to do with them when I bought them but they were too cool to pass up. But when I came across them this time it hit me. Glass Pendants. I've seen those long glass tiles that they sell at the craft store (24 for around $6) that you decorate with paper or photos and then slide into the metal frames with built in hoop (3 for $6) for an instant pendant necklace. I thought there must be a way to make a pendant necklace from these vintage scientific slides. I would have just bought the metal frames but my slides were about 1/4 inch too long. Drats! So I played around and did some jewelry research. I definitely stepped out of my crafting comfort zone on this one but I'm glad I did.


This is how I did it:
1. Clean the slides with soapy water.
2. Decorate: I went the fast and easy route with this step so I used some tissue tape by Tim Holt. It runs about $9 (but of course I used my 40% off coupon). It came with two rolls. One was dictionary like page writing and the other sheet music. Just right for me. This stuff is great. It sticks right to the slide and easily tears off and looks great overlapped. And you get a lot...I have plenty left over.

3. Seal the pendant. You can use Diamond jewelry sealer that you can get at the craft store or just use Modge Podge like me.
4. Warning: This is the step that takes time, at least when you are making 80 of them! You will need to get some Aluminum foil tape wrap (found at the craft store). It has adhesive on one side so you can stick it right to the tile. The hard part is getting the tape to line up just right so that it wraps around the front and back of your tile evenly and stays straight.


5. After your slide dries you need to attach your bail so you can actually use it as a pendant. This is where my research helped. You need to get some Aanraku style bails. I went to Amazon (because I had a gift card) but Etsy also carries them. You will also need E 6000 glue (this stuff can easily be found in a craft store or even Walmart). Just put a THIN amount of glue on the flat part of the bail and a THIN amount on the glass tile where you will be attaching the hook. Wait about 2 minutes then press the bail and slide together.
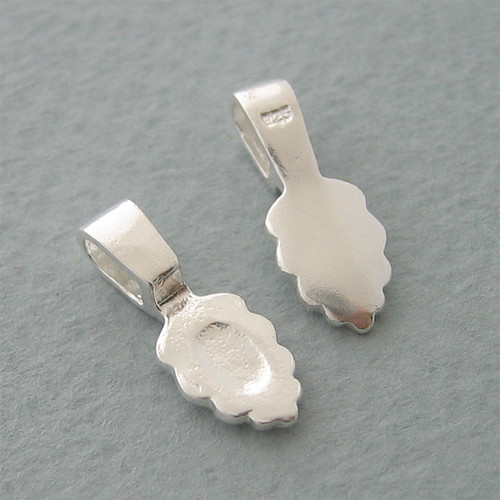 |
| Aanraku style bail |
6. Wait, wait and wait some more.
You need to let the glue cure about 48 hours before you can wear the pendant. But, I think the wait was worth it.
You may not have vintage scientific slides but you can buy the 24 slides for $6 at the craft store and make some for yourself. They were easy and the possibilities are endless with how you can design them.
I'm also linking up to Jen at Craftomatic: http://craftomaniac.blogspot.com/2011/02/craftomaniac-monday-link-party_07.html

Those turned out fantastic!!
ReplyDeleteThose are really great...I have been eyeing both the tissue tape and that foil tape...might have to grab my coupons and go get them now!
ReplyDeleteYour pendants turned out beautifully!
ReplyDeleteI've worked with the foil tape before, but my projects didn't not turn out as well as yours.
Gorgeous!
Amber
Those are so lovely! I've made a few of these over the years and they are so fun! Thanks for sharing! I'm so glad you shared this on Cindy's Show and Tell!
ReplyDeleteThese are great! Thanks for sharing!
ReplyDeleteOh how beautiful! I am visiting via the Valentine linky.
ReplyDeleteI wanted to invite you to the two linky parties I am planning. The first will be on February 23~ High Tea Tablescapes. Details can be found on my Wednesday posts. There will be PRIZES!
Happy Valentine's Day!
so where did you get those bails? wonderful look ;)
ReplyDeleteI really love these!!! I have a great love for music... what a great idea! please come link this to our party over here: http://www.bubblynaturecreations.com/2011/02/project-party-weekend-heart-shaped-ice.html
ReplyDeleteHave a great weekend!
Great idea and tutorial. Love the look of these. Thanks for linking up with VIF!
ReplyDeletehugs,
Debra
Hi..just found your blog and am hooked. Have subscribed so l don't miss anything. What a clever artist you arexxlynda
ReplyDeletehttp://tryingtocreatearteveryday.blogspot.com
and
http://chocolatelifeandjazz.blogspot.com
Enjoyxx
This is terrific! Love the finished product - thanks so much for the wonderful tutorial!
ReplyDeleteKathy
Very clever...just love it when a great idea suddenly happens!
ReplyDelete~Pam
pamspaintparlor.typepad.com
Very cute, your title really caught my eye. What a great use of those cool old slides.
ReplyDeleteScience teacher here. Cool idea. I'd love to have one of these myself. My science teacher friends would love these.
ReplyDeleteI like the idea of using the tape around the slide instead of soldering. Very cute!
ReplyDeleteI always wondered how they made those glass pendants. Now I know. Thanks for the tute!
ReplyDeleteI really like the music one! I've got to get me some of that stuff... I've never made jewelry either. I'm hoping my first attempt is as good as yours!
ReplyDeleteWow! I love those. You did a great job. Thanks for sharing! I found you from Made By You Mondays and am now following you.
ReplyDeleteMelanie
www.youmadethat.blogspot.com
I love these, they look great! Thanks for sharing how to do this, maybe one day I'll give it a whirl. Until then, I'll drool over yours....
ReplyDeletexoxo,
Ellen
These are beautiful and even though they are timeconsuming to make they seem quite easy to do.
ReplyDeleteThank you for sharing.
great job, well done. thank you for sharing. xx
ReplyDeleteHow cool is that?? You are a great accidental jewelry maker! *grin*
ReplyDeleteThanks for taking the time to discuss this, would you mind updating your blog with more information? It is extremely helpful for me.
ReplyDeleteAwning Signs Sydney & Vehicle Signs Sydney