Showing posts with label book wreath. Show all posts

Monday, May 9, 2011

restocking

I hope you all had a lovely Mother's Day weekend and got to enjoy the good weather and spend some time with your loved ones!

I will trying to restock my Mudpies & Marigolds Etsy shop following a large wholesale order last week.

I'm sucking it up and listing my Vintage shabby chic French picnic basket that I love so much.  If you remember way back when I made it I said I was going to sell it, then I just couldn't bring myself to do it.  But now I have a new basket to redo so I'm passing this one along.


I also listed my Farmhouse chic birdhouse planter

birdhouse planter with vintage book page and burlap flowers


A pair of Aqua Candle Sticks

Pair of aqua candle sticks

A pair of White shabby chic candle wall sconces

pair of shabby chic white candle wall sconces

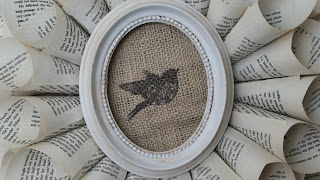
and one of my little Burlap and bird book page wreath.

vintage book page wreath, burlap and bird in antiqued oval frame

I have so much more to list but I will be doing it slowly over the next couple of weeks.  I'm trying really hard not to burn myself out or neglect the other responsibilities I have as a stay-at-home mommy..it's been hard, but I'll figure it out.

I hope you all have a great day!

Friday, May 6, 2011

Mother's Day

It's Mother's Day weekend and me and my little Punky Brewster are headed to see my Momma tomorrow and spend some quality time.  I will be taking the Mother's Day presents I made for her with me of course.

I was going to make my Momma a breast cancer ribbon book page wreath {she is a breast cancer survivor and I'm so proud of her} but it somehow morphed into this:


It's a book page wreath with two "tiers".  The center features a white coffee filter with a pink crepe paper flower with a vintage button center.

I think this is a little more "Mother's Day" looking than what I had originally planned.  I think I will save the Breast Cancer ribbon wreath for Breast Cancer Awareness Month.

She also mentioned that she like my altered peat pot bird's nest.  I sold 11 of them from my Etsy shop yesterday, but luckily I set one aside last week for her.


To all of you mothers out there, I wish you a very happy Mother's Day!  For everyone else, make sure you spoil the mothers in your life rotten this weekend!  :)  Are you reading this honey?!  Hmm, probably not.

Monday, March 28, 2011

Okay, THIS is my new favorite wreath

Do remember in this post, when I said this was my new favorite wreath.


Well, I lied was wrong.  At the time it was my favorite wreath.  I still love it.  It sold really quickly so I only had it around for about 2 days before it went to it's new home. 

Well, the last couple of weeks has been a mad rush to finally make all these projects I had stuck in my head and use up my stash before my first craft show.  So...I have made about 25 wreaths of all different kinds {i.e, don't be surprised if you see a couple more wreath post in the upcoming days}.  I started out making some book page wreaths.  I've made book page wreaths before {as you can tell by the picture in my header}, but this my favorite... so far. 


After the madness of the craft show is over, I'm going to make one with a pink coffee filter and a breast cancer ribbon in the center for my Mom.  She's a breast cancer survivor and I'm so proud of her!

I used a book that was already falling apart {i.e. no rare or well conditioned books were harmed in the making of this project}.  It is very, VERY inexpensive to make BUT very time consuming.  As in 2 hours, or MORE.  But I adore the way it turned out.  If you haven't made a book page wreath before, it may take one or two tries before you really figure out how to do it without it being too large or crooked.

This is what I use as my base:


Yep that's a round piece of thick cardboard {Ala frozen pizza}.  So, that was free.

I used Modge Podge on one side of the cardboard and covered with some book pages from the same book I am using to make the wreath out of.  Allow to completely dry.  This side will be the back side of your wreath.  Note:  You do not have to do this step, but I think it makes for a more polished look.

This next step takes the longest.  Start rolling your book pages into cones and hot glue closed.  I cannot give you an exact number of cones you need...it always varies depending on how big you make your wreath and if you do 2 rows or 3.  I would say make about 50 cones to start with and go from there.


Now pick out a ribbon or twine you would like to use to hang your wreath and hot glue it in place where the inside of the wreath will be {i.e. the unfinished side, then your cones will cover up where you hot glued}

I always lay out my first row of cones before using the glue,  This lets you decide how big {in diameter} you want your wreath to be and more the cones up and down to get the size you want.

Start gluing baby!  Once your outer row is done, start on the inner row, placing the cones strategically between the gaps in the cones from the outer ring.  You shouldn't be able to see any of the cardboard base.


If you want a third row {like this wreath has}  then go ahead and keep gluing.
*  For the second and third row, I tend to have to flatten out the tip of the cone with an eraser end of a pencil as I hot glue to allow it to lay properly


Now you can finish off the center of your wreath.  I love the The Graphics Fairy and usually find an image there I want to use.  On my this French Fleur De Lis wreath, I used a brown coffee filter with two overlapping images from the Graphics Fairy in the center.  You can use anything you want to finish off the center:  fabric rosette {like the one in my header}, printed images, ribbon, lace, crepe paper flowers or ruffles, etc.

Here is another book page wreath I made that same day.


I used a 25 cent thrift store that I painted white and aged with a brown glaze.  I love this bird stamp but had never used it so I decided to break it out for this project and stamped some burlap.

Have a great and creative day!

Linking to the parties on the sidebar and those below:

No Minimalist Here House Party
The Lettered Cottage


Photobucket

Sunday, February 6, 2011

free business cards


I recently started selling on Etsy and I decided that it was probably time to get business cards.  I needed something cute, cheap and easily attachable to my products.  But I wanted something that was different than the typical old run-of-the-mill business card.  I am already a member of Picnik which is a photo editing site online.  It is free to use most of the tools on the site.  I though that if I could come up with a picture I like I could edit it to have my business name and site written right over the top.

So the first place I went was The Graphics Fairy.  She has hundreds of vintage images and they are all free. Isn't that amazing!

You can do it too!  It was so simple, all you need is card stock, computer, printer. 

So here is your business card tutorial:

1.  Pick an image and save it to your computer.


I choose this cute little princess

2.  Go to Picnik and upload the saved image. 

3.  Resize the image so it will function as a business card. {I set my image to 80% }

4.  Then go to the "create" section of Picnik's site and choose a font .  Add your business name and Etsy website name to the image. 

5.  Save it to your computer.


6.  Open up word and insert the edited image.  Copy and paste until the page is filled up.

7.  That's it!  Just copy onto card stock and cut out.

I'm also going to use these as price tags for craft shows!


Now go over to The Graphics's Fairy and make your own business cards.

Linking to Brag Mondays at the Graphic's Fairy

Sunday, November 7, 2010

Holiday inspiration

I can't stop thinking about the holidays and I'm really fighting the urge to put up the holiday decorations.  I mean REALLY fighting it!  I've been cutting my cravings by making some holiday gifts and decorations.  Miss Mustard Seed has really inspired me this year with her sheet music wreaths and ornaments.  I could only get my hands on one book of music so I used that to make this wreath.


But I do have lots of old, falling apart books so I think I will use those to make my ornaments this year.  So far I have only made one of these (I wanted to test out the look before I committed to making a whole tree worth).


But my favorite by far is this book wreath tree topper I made yesterday evening.  I basically used an El Cheapo chipboard like coaster that I bought in a set of four for 50 cents at the craft store this summer ( I just knew that I could use them for something).  I covered it with parchment colored scrapbook paper.  I then made several (maybe 20) cones out of vintage book pages.  I broke out my trusty hot glue gun and got down to work.  So this vintage inspired tree topper cost me nothing!  Well except a couple of hot glue burns.  Yay!

Yes, that's a oil bottle.  Like I said, fighting the urge!

Party time...


Chic on a Shoestring DecoratingVintage Inspiration Friday


Tuesday, September 14, 2010

Ugly Buffet?

In my last post (which was way too long ago) I said that I wanted to take advantage of nap time and get my creative juices flowing again.  Well, I have been busy but mainly making decor, invites, etc. for my daughter's upcoming 2nd birthday party.  I will wait until after her party to post about all those items. 

Today I wanted to show you what I did with  my Labor Day weekend (my parents were nice enough to take our daughter for the weekend so I could get some much need cleaning done).  I wish I could say I accomplished more with my time...but...well, I mainly caught up on sleep. 

But I did create a buffet for my dinning room out of a $10.00 thrift store dresser.  My husband HATES it.  I get that it's funky, shabby and won't be everyone's tasted but I LOVE it!  I forgot to take a before picture but it was rough.  It had a veneer top that was coming up everywhere so I thought it would be easy to rip up...I was WRONG!  That my friends was a pain in the butt.  I primed it, painted it, distressed it and Modge Podged the top using pages of a 1930's book I found at a garage sale for a quarter.  I finished with a coat of poly.

Do you think it's ugly too?  It's okay if you do.  <3


I had so many pages left from the vintage book that I decided to make something out of some of them.  I decided it would make an equally funky/shabby wreath.  So here it is...