Do remember in this post, when I said this was my new favorite wreath.

Well, Ilied was wrong. At the time it was my favorite wreath. I still love it. It sold really quickly so I only had it around for about 2 days before it went to it's new home.
Well, the last couple of weeks has been a mad rush to finally make all these projects I had stuck in my head and use up my stash before my first craft show. So...I have made about 25 wreaths of all different kinds {i.e, don't be surprised if you see a couple more wreath post in the upcoming days}. I started out making some book page wreaths. I've made book page wreaths before {as you can tell by the picture in my header}, but this my favorite... so far.

After the madness of the craft show is over, I'm going to make one with a pink coffee filter and a breast cancer ribbon in the center for my Mom. She's a breast cancer survivor and I'm so proud of her!
I used a book that was already falling apart {i.e. no rare or well conditioned books were harmed in the making of this project}. It is very, VERY inexpensive to make BUT very time consuming. As in 2 hours, or MORE. But I adore the way it turned out. If you haven't made a book page wreath before, it may take one or two tries before you really figure out how to do it without it being too large or crooked.
This is what I use as my base:

Yep that's a round piece of thick cardboard {Ala frozen pizza}. So, that was free.
I used Modge Podge on one side of the cardboard and covered with some book pages from the same book I am using to make the wreath out of. Allow to completely dry. This side will be the back side of your wreath. Note: You do not have to do this step, but I think it makes for a more polished look.
This next step takes the longest. Start rolling your book pages into cones and hot glue closed. I cannot give you an exact number of cones you need...it always varies depending on how big you make your wreath and if you do 2 rows or 3. I would say make about 50 cones to start with and go from there.

Now pick out a ribbon or twine you would like to use to hang your wreath and hot glue it in place where the inside of the wreath will be {i.e. the unfinished side, then your cones will cover up where you hot glued}
I always lay out my first row of cones before using the glue, This lets you decide how big {in diameter} you want your wreath to be and more the cones up and down to get the size you want.
Start gluing baby! Once your outer row is done, start on the inner row, placing the cones strategically between the gaps in the cones from the outer ring. You shouldn't be able to see any of the cardboard base.

If you want a third row {like this wreath has} then go ahead and keep gluing.
* For the second and third row, I tend to have to flatten out the tip of the cone with an eraser end of a pencil as I hot glue to allow it to lay properly

Now you can finish off the center of your wreath. I love the The Graphics Fairy and usually find an image there I want to use. On my this French Fleur De Lis wreath, I used a brown coffee filter with two overlapping images from the Graphics Fairy in the center. You can use anything you want to finish off the center: fabric rosette {like the one in my header}, printed images, ribbon, lace, crepe paper flowers or ruffles, etc.
Here is another book page wreath I made that same day.

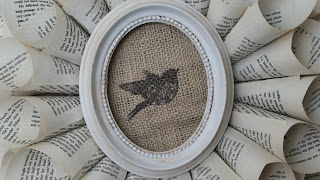
I used a 25 cent thrift store that I painted white and aged with a brown glaze. I love this bird stamp but had never used it so I decided to break it out for this project and stamped some burlap.
Have a great and creative day!
Linking to the parties on the sidebar and those below:
No Minimalist Here House Party

Well, I
Well, the last couple of weeks has been a mad rush to finally make all these projects I had stuck in my head and use up my stash before my first craft show. So...I have made about 25 wreaths of all different kinds {i.e, don't be surprised if you see a couple more wreath post in the upcoming days}. I started out making some book page wreaths. I've made book page wreaths before {as you can tell by the picture in my header}, but this my favorite... so far.

After the madness of the craft show is over, I'm going to make one with a pink coffee filter and a breast cancer ribbon in the center for my Mom. She's a breast cancer survivor and I'm so proud of her!
I used a book that was already falling apart {i.e. no rare or well conditioned books were harmed in the making of this project}. It is very, VERY inexpensive to make BUT very time consuming. As in 2 hours, or MORE. But I adore the way it turned out. If you haven't made a book page wreath before, it may take one or two tries before you really figure out how to do it without it being too large or crooked.
This is what I use as my base:
Yep that's a round piece of thick cardboard {Ala frozen pizza}. So, that was free.
I used Modge Podge on one side of the cardboard and covered with some book pages from the same book I am using to make the wreath out of. Allow to completely dry. This side will be the back side of your wreath. Note: You do not have to do this step, but I think it makes for a more polished look.
This next step takes the longest. Start rolling your book pages into cones and hot glue closed. I cannot give you an exact number of cones you need...it always varies depending on how big you make your wreath and if you do 2 rows or 3. I would say make about 50 cones to start with and go from there.
Now pick out a ribbon or twine you would like to use to hang your wreath and hot glue it in place where the inside of the wreath will be {i.e. the unfinished side, then your cones will cover up where you hot glued}
I always lay out my first row of cones before using the glue, This lets you decide how big {in diameter} you want your wreath to be and more the cones up and down to get the size you want.
Start gluing baby! Once your outer row is done, start on the inner row, placing the cones strategically between the gaps in the cones from the outer ring. You shouldn't be able to see any of the cardboard base.
If you want a third row {like this wreath has} then go ahead and keep gluing.
* For the second and third row, I tend to have to flatten out the tip of the cone with an eraser end of a pencil as I hot glue to allow it to lay properly
Now you can finish off the center of your wreath. I love the The Graphics Fairy and usually find an image there I want to use. On my this French Fleur De Lis wreath, I used a brown coffee filter with two overlapping images from the Graphics Fairy in the center. You can use anything you want to finish off the center: fabric rosette {like the one in my header}, printed images, ribbon, lace, crepe paper flowers or ruffles, etc.
Here is another book page wreath I made that same day.
Have a great and creative day!
Linking to the parties on the sidebar and those below:
No Minimalist Here House Party